Holiday Wreath: Achievement Unlocked

You guys! Remember this post I wrote, a mere four years ago, about how all I wanted to do was make a wreath for the holidays?

Well, after buying a kit, a styrofoam ring, reading the pattern, and letting it all sit in my craft room for over three years, I finally pulled it all back out again over the summer and was determined to have a wreath before Christmas came and went.

Unbelievably*, I made it happen. (Thanks, past Zoe, for starting in July; she knew Present Zoe would struggle to get this done.) I did have to force myself to stick with it, especially since I was knitting socks and finishing up other projects in between. (Let’s face it, some of those projects were direct procrastination to avoid the wreath.) I think it felt so tedious because the pattern is making a gigantically long parallelogram and doing single crochet only in the back loop, sometimes increasing, sometimes decreasing, the entire time. When you have to single out the back loop, that’s where it prevents the pattern from being totally mindless.

That said, when I finally got to the phase where I was wrapping the wreath, it was relatively easy.**

After sewing the wreath around the styrofoam form, I had to crochet all the components of the bow. There were three pieces to the bow and an additional attachment piece, making for four pieces in total. It sounds like a lot, and it is, but the design is quite good, and despite all the sewing at the end, it was worth it. It also added some necessary oomph and wow factor to an otherwise attractive wreath.

I haven’t decided where to hang the wreath yet (or perhaps save it in my gift pile?) but I am really happy I tried my hand at this. I would make another one, actually, but instead of more muted colors, I would go for a white and red peppermint/candy cane look to the wreath. I think that would look really good, maybe even with some subtle sparkle in it. If you’re interested in this pattern, you can find it on Ravelry and buy it directly from the designer. It used to only be a kit on Craftsy, which is how I ended up with mine, but now you can get it for the very reasonable price of $4.00. I did not opt to make the poinsettias, but if you’re a fan of them and want to make some by hand, you’ll have the option!

For the yarn, I used the stuff that came in the kit, and it was very decent acrylic yarn. The bow used up a leftover scrap cake of Caron Simply Soft (color: gold). It has a nice sheen to it and a bit more stiffness, so it’s not curling and it’s holding its shape, which is ideal.

Ho ho ho and all that fun stuff–if you decide to try this wreath, or perhaps you have already, please leave a comment!

*The pandemic certainly didn’t help my motivation level.

**Easy is relative here because most people want to Crochet or Knit a Thing and be done with it, but you will always have to weave in ends and many more times, you have to seam/sew something. Little pro tip, kids: don’t get into crocheting or knitting if you abhor the thought of sewing by hand. You’ll have to do it at some point! But you do also learn new skills, so there’s that.

Dipping My Toe in to the Baby Yoda Craze

I’m finally able to peek out and post a completed project after a couple of really crazy months, and I’m not even talking about the pandemic. I hope each of you are doing well and staying safe and healthy. What a scary time this is with so much unknown. On to the post…

Firstly, a confession: I have never been able to get into Star Wars. I know it’s one of the biggest movie franchises of all time and has a lot of merit. For whatever reason, it just never spoke to me, although that’s not to say I can’t appreciate aspects of it, and certainly some of the characters.

After The Mandalorian came out and it was revealed there was a Baby Yoda character, I “Awww!”ed at it just like the rest of the globe, even without any context. I waited a pretty long while, comparatively speaking, but finally decided to try my hand at making an amigurumi doll. I have at least one friend who is obsessed and when I started out, I knew I would ultimately give her the doll if it turned out decently.

Fortunately, it did!

I started this little guy back in February and due to all sorts of craziness in life, I was only able to pick it up and work on it a teeny part at a time. Mid-April, I forced myself to figure out the coat and finish it so I could give it to my friend (curbside drop-off with proper distancing, no less).

I did end up tailoring the coat to fit my doll the way I wanted it to–I did not end up doing the folded down collar for the coat that the pattern will yield. There are more detailed dolls and patterns out there but for an initial project, certainly, but all in all, this free pattern from Bee Friends Crochet works really well for anyone who just wants to dip their toe in, as I did.

If you want to see the in-progress photos, you can go to my Instagram page where I have a saved highlight in Stories of the doll coming together.

My favorite details about the doll are the eyelids (chained 6 for the upper and another 6 for the lower and carefully sewed them on) and giving the doll a bit of fuzz on top of the head for a bit more authenticity. That’s why you’ll see a close-up of the top of his sweet little head.

After I posted the photos of the doll on social media, I had a few friends ask me to make them one, so now I have three going at one time. (I do not have this available in the shop at this time.) I know I will burn out after a while but for now, the Baby Yoda Machine is in full swing!

Are you a fan of Star Wars? Or just along for the ride on the Baby Yoda bandwagon like I am?


Sweet Little Tree of Mine

Happy holidays, everyone! I know not everyone celebrates Christmas or is into Christmas trees, but if you are, this is the post for you!

I finally delved into my pattern trio from Lalylala (Lydia Tresselt) and made the Christmas tree (the other two are angel and candle)! It’s amazing how when I buy patterns, I have every intention of making the item RIGHT NOW and it rarely ever happens. Timing is important when it comes to crafting, it seems.

Anyhow, I decided I would make up a little tree for my office’s holiday gift exchange and thought it would be festive and cheery enough that most people would like it, whoever ended up with it.

I’ve made enough amigurumi that the actual doll itself didn’t take too long – a handful of hours. The sewing of the beads with invisible thread was the task that took a lot of patience. Thankfully, if you do it while you’re watching holiday movies or something, it doesn’t feel like a chore. So I would say this pattern is advanced beginner, depending on your sewing skills. Of course you don’t have to sew anything onto it. The tree itself is adorable as is.

Here’s my first little tree doll — I bought more beads so I can make more of these cuties. Makers, have you tried this pattern yet?

Happy holidays to you, whatever you celebrate! (Or don’t! Merry Whatever!)

Llama Rama Ding Dong

Over the summer, I had a request to do a custom llama – white with some black included, based on a photo.

This animal is a challenge for several reasons, one of which is the abundance of llama patterns out there. I ultimately settled on one where the emphasis was not on sewing a bunch of limbs together, and the final shape was a very obvious llama.

My only challenge with this pattern is that you have to turn it inside out before seaming it up the back, and then you quickly have to stuff all the limbs before moving forward. It’s unconventional but I will credit the designer with a pattern that works well in the end. The llama stands up on its own and is really cute.

Due to the success of the first one, I received another order for a pink one to send to a family member who’d just had a baby girl. This one was a bit easier because it was all in one color and it turned out great!

I finished this amigurumi in October and I have taken a little break since then. I am gearing up again since the holiday season is on top of us (where did this year go?) and I would like to get a few things accomplished that are holiday-oriented. (Remember this post from last year?)

Cute photos below!

Chevron Convert

IMG_2202 zvc
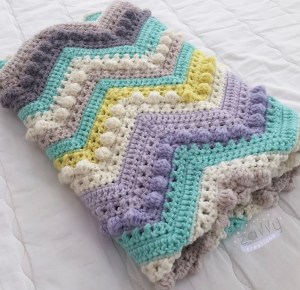
When chevron was blowing up a few years ago, I didn’t get into the trend right away. But after I tackled a couple of projects that used it, I really liked the look of it, colors depending.

Last year, Jeanne from The Crochet Crowd designed this chevron “hugs and kisses” blanket using Caron Baby Cakes. I liked it as soon as I saw it. My transfixed inner voice said, “I must make the thing.”

It took me longer to complete than I would have liked, but largely that was due to my getting sidetracked with orders, work, and other life goings-on. It is not a difficult pattern.

For my blanket, I decided to blend two different colorways, Dreamy Mint and Frosted Pansies. I wanted a pop of yellow in there to break up the teal, grays, lavender, and cream. I liked working with this yarn, for the most part, but it can split at times. It is very soft and warm, though, and I like how easy it is to wash and dry it.

I found this project relatively soothing to create, although I had to keep careful track of my rows, since it the pattern repeat consists of 8 rows. For the bobble stitches, I switched from my usual comfortable Clover hook to my Furls Odyssey hook, which has a nice long neck, ideal for working with a fluffier, thicker yarn such as this one for bobble stitches. Because you alternate with something different each time, it keeps you on your toes. It is not dull or mindless to complete.

I ended up not using all four cakes, since I did not chain as many initial stitches, opting to make something slightly smaller than the pattern calls for. (I believe it calls for 6 cakes.) Because I didn’t want the blanket to be overly taller than it is wide, I stopped with the cream color of the fourth cake. I had enough to do a single crochet border in cream around the entire blanket, which gives it a nice finished look. My blanket is roughly 31″ wide and 36″ tall.

I didn’t have an intended recipient for this blanket, so I’ve listed it in my Etsy shop. It’s largely neutral and I think the colors pop so nicely with the chevron pattern. Jeanne did such a nice job with the design.

Have you tried your hand at this one?


Challenges with Color Changes

Late last year, I had two back-to-back orders for baby penguins. Due to the holidays and typical year-end madness, I didn’t get around to doing a post about either of them.

In previous renditions when doing the color changes in the head (white eye areas on a dark gray/light black background), I have kept my two colors of yarn going simultaneously, but I have had mixed results with the color changes looking loose in the end product.

I made an executive decision as a woman who takes pride in her handcrafted goods. I changed things up by snipping one of the colors for each round (the white in the head) and tying secure knots with the loose ends. I found this to be much more successful in keeping the stitches tight (as color changes can produce looser or sloppier looking stitches), not to mention not wasting a lot of yarn carrying tails back and forth around the head. In the end, the dolls looked polished and professional, and I didn’t have to worry about a stray end coming loose if the doll ends up in the hands of a careless child or pet.

Finished penguin with tight color changes

Fast forward to the present moment. In one of the crochet groups I am in on Facebook, someone posted this blog article, where the author wrote about doing more seamless color changes in amigurumi.

I gave it a try the next time I worked on a doll (this time, a giraffe) — and I am pleased to say it is a successful technique!

Giraffe with new color changes technique used

As you can see from the photo, where the color change happens when you’re working in the round (without a join), the jog isn’t as noticeable. Check out the horns. It doesn’t glare out at you and you don’t get the “zig-zag” effect. Sometimes the zig-zag looks okay for a particular effect but for the most part, it looks nicer when it can be avoided.

Even my husband, who doesn’t notice much of what I’m doing with crochet most of the time since I’m always working on something, thought the this color-change technique was noticeable and one to keep using.

There are a couple of key points I discovered: slip stitching loosely is important, or the piece will look slightly shrunken on that round. If you’re going for the shrunken effect, slip stitch more tightly. The other point is to make sure there are enough rounds between the color changes that aren’t doing a lot of increasing or decreasing. In fact, it is ideal to change colors when there is another round of one single crochet stitch in each stitch around.

Lastly, the slip stitch round + doing the next round in the back loops with single crochet = one round. Knowing that helps with counting your rounds, since you’ll see the two horizontal lines next to one another. See photo below:

If I’m not mistaken, the blog post I linked to above has gone viral in the crochet world, because I have seen the “big time” crochet designers doing their own posts showcasing their successes with it.

Have you tried this out? What do you think?


Lulu the Unicorn: Raising Funds for Lupus Foundation!

Guys, I am so excited to share this finished creation and post with you!

A friend of mine is the President of the Lupus Foundation-Heartland Chapter in St. Louis, MO. Although I live 2.5 hours away, I do what I can to donate time and resources to this not-for-profit. Lupus is still undergoing research into how it operates, which means it’s more difficult to get a diagnosis, and treatment for the disease is challenging. Because it’s so “mysterious,” it doesn’t get the same kinds of attention that other illnesses do, such as breast cancer.

The types of services Lupus Foundation provides include support groups, camp for teenagers, and countless others to those of all ages.

The Heartland Chapter serves a large corner of the Midwest. As it goes with all not-for-profits, they have various fundraisers throughout the year. Their big event is The Purple Ball.

This year’s Purple Ball is at The Four Seasons on Saturday, April 7, 2018. It is a really fun affair; my husband and I were able to attend last year. We aren’t able to go this year so instead, I was asked to create something as an auction item.

I thought the unicorn pattern from My Krissie Dolls would be the perfect thing to be creative with, particularly if I made the unicorn with shades of purple for the mane and tail.

I gave myself plenty of time to make the doll (especially because you can’t rush a good mane) and honestly, it came out exactly as I’d hoped. I think she’s a stunner! She is a very large doll, too, at 18″ tall.

Currently, there is a post on the zavvy creations Facebook page with a “Donate now” button and the event information. If you are in the St. Louis metro area and want to inquire about attending the event OR if you would simply like to give to a terrific cause (with a small but mighty team of people who work for Lupus Foundation-Heartland Chapter), hit up that post or this link for more information and/or to donate on their website instead of through Facebook.

Every little bit counts, so if you are able to give even the smallest of donations, it means the world to me and to those who will be able to benefit from the services this organization provides.

Lulu 3

Lulu 1

Lulu 2

Lulu 4

If nothing else, happy Spring and pastel season! Bunnies and eggs and chocolate, oh my!

Update as of April 18, 2018: Lulu and the rest of the auction items helped the Purple Ball raise a significant chunk of change to make it an incredibly successful event! Thrilled for my friend and the organization. 

Completed: Sepp the Seahorse Doll from Lalylala

Hi, friends.

I believe a little while ago I mentioned that I had finally completed the seahorse doll (pattern from Lalylala), which took me the better part of two years to make, but only because I put him down for long periods of time.

At last, I processed a few of the photos I managed to get before I shipped off the doll(s) to their new home. I didn’t get any really terrific shots with my nice camera because I was under deadline to finish it as a gift for a new baby back in January.

I heard that the family did love the seahorses, as their theme for their baby son’s nursery was the ocean.

Success!

A relative had given me a bunch of shiny Bernat baby yarn a few years back and when the seahorse project came up, I decided I would use it to create a shimmery look. It worked out very well for this purpose, but because the yarn is thin and crinkly, there were times I almost gave up making the doll with this yarn.

On top of the difficulty of working with the yarn is the fact that Lalylala designs her patterns with tons of details for the maker. I would think I was nearing the end and I realized I had to do the fins and details for the body. Those took me much longer than I anticipated because doing surface slip stitch with teeny thin yarn that splits easily is not exactly fun.

Regardless, I plowed through, and I am really pleased with the overall result. If you’re on Ravelry, you can see the project details here. Despite using much finer yarn, this doll was huge at 14″ tall.

I think I could do another one of these dolls but probably not as a custom order, since it’s difficult to predict how long it will take me to finish it. But I could see myself making another and listing it in the shop someday.

Here are the photos! Whee!

IMG_1170_zvc

IMG_1173_zvc


The Cuddliest Snowman

Well, folks, we’re getting down to the last week of 2017! (Hurrah!)

While I usually mourn how quickly a year has gone by, this one I am ready to bid adieu so I can say, “Hello, 2018!”

I am still working on a project here and there, and it’s possible I’ll finish up one or both before 2017 gasps its last breath, but my most recent finished project is too cute not to share and celebrate.

The pattern is from The Crafty Fox Crochet. I saw this snowman in my Instagram feed a lot in the last month; it was a really popular creation amongst crocheters this year. I decided to try my hand at it and I really liked making my inaugural cuddly snowman!

The color options are endless for the scarf, hat, and pom-pom, though I find poms are more of a yarn commitment, since it takes so much to make one. My first one fell apart and I was very squinty about the waste of yarn before I finally got the second one to work (pictured).

I ended up using this snowman as a giveaway gift in a white elephant holiday game, but I think in the future, I’ll reserve making them for those who really treasure these kinds of gifts.

I hope your holiday season is going well, friends. Happy jolly merry holi-daze!