Sunnyside Preschool Halloween Carnival and Auction

It’s autumn. At last! Probably the most favorite season of all seasons. With it comes the cooler temps, the leaves bursting into color, sweater weather, the smell of wood smoke in the air from fires being lit, hot beverages (with marshmallows), Pumpkin Everything, crocheted accessories like scarves and fingerless mittens, Halloween, Thanksgiving, and the pre-Christmas festivities and anticipation. Oh and don’t forget the millions of pins that will be pinned on Pinterest with all the autumn excitement.

There is a lot packed in to three months!

Autumn also brings fun festivities, like Halloween carnivals! A friend of mine who lives in California reached out to me to ask whether I could donate  some items for a Halloween carnival and auction to raise money for her son’s preschool.

I was delighted to help out and checked my stores for some things I could give away. I happened to have some things that I thought would make someone very happy if they bid on them; I also added an amigurumi to round out the package.

So here is what will be up to win and/or bid on!

IMG_1191 zvc

IMG_1175 zvc

IMG_1178 zvcIMG_1171 zvcStarburst blanket
Stuffed whale
Striped baby hat

In addition to the items, I also included a card with a special discount code for any purchase in the shop.


IMG_1182 zvcIf you have any questions or comments about the items I donated, please leave me a comment below.

Happy autumn and Halloween season!

Farewell to Summer and a Few Amigurumi

Happy post Labor Day weekend! I hope it was relaxing and a bit cooler than ours was in the middle states. Summer is still going strong but thankfully, cooler weather is on the way, so it won’t feel quite so ridiculous to be focusing on hats and blankets and scarves and other cozy items.

The weekend saw me  whipping out amigurumi orders, one after another–pictures below in a bit. On a whim, I listed this gorgeous blanket on Sunday and it ended up selling right away, which was a terrific feeling. It really is a beautiful blanket and I hope the new owner falls in love with it like I did when it was finished.

Corner to Corner Jewel Toned Blanket - Folded
Just before Labor Day when All the Toy-Making was happening, we had friends in town and the only thing I had out was some Chroma Worsted yarn from Knit Picks and a Tunisian crochet hook. By the end of the weekend, I had whipped up this ribbed hat :

zv hat
For what it’s worth, I do like the pattern, and the variance of knit and purl stitches keeps the hat from curling, which is really nice, since Tunisian loves to curl up on itself. My only gripe with it is that the top is a little bit holey when it’s all said and done. I think that’s why it’s pretty critical to put a pom on top–something I have yet to try. If you’ve made this hat and have comments, I’d love to hear!

Now on to the amigurumi. I’m currently coasting into the final toy of the final order I’ve received since late August, which is a cow. But over the weekend, I ended up producing:

  • One whale
  • One baby bunny (and a practice bunny)
  • One cornflower blue hippo
  • One chocolate brown elephant

It may not seem like a lot but trust me when I say making four (technically five) animals  is quite a bit from Friday to Monday, not including eating, sleeping, going to Zumba, Netflix, etc. Here are a few photos, some of which are not the best, admittedly. I’ll have more when I’ve finished the cow and I can take some ultra cute pictures of the finished trio.

Hoping to be able to work on some more wearables and holiday items now that we’re in the last few months of 2015 (where has it gone?!). More to come!

IMG_7806IMG_7799_zvc IMG_7822_zvc IMG_7823_zvcIMG_7810_zvc

Particulars of the Invisible Decrease

For anyone who has visited my Etsy shop or my Facebook page, you’ll know I make a lot of amigurumi. And if you didn’t know that before, it is the bread and butter of my little side business.

It has probably taken me the past thirty or more creations to hone the skill of decreasing rounds so that there are few bumps and holes showing on the finished doll; not an easy task.

There are a handful of ways to decrease in the round, with a couple of them dubbed as an “invisible decrease.”

The regular decrease when working in single crochet, or sc2tog, is simply inserting your hook into the next stitch, yarning over and pulling up a loop, repeating on the next stitch, yarning over and pulling through all loops on the hook. Simple pimple, right?

It does work and it will quickly tighten the round. It’s really good for when you need to shape the doll using decreased stitches, a skill some designers have mastered. (See the Etsy shop “Stuff the Body” for examples–she does a lot of designs that don’t involve sewing because she shapes the animals with increases and decreases. It’s pretty brilliant.)

But when you make a lot of typical amigurumi with your basic round shapes, you want to find the right invisible decrease that is smooth and really effective. It took me a while to figure out what I liked and what worked best for me, but this is my recommendation for the best invisible decrease when doing single crochet in the round:

Insert hook into the front loop only of the next stitch; do NOT yarn over. Insert hook into the back loop only of the following stitch; yarn over and pull through two loops, yarn over and pull through remaining two loops.

The pink highlights the stitches where the yarn has been inserted (one front loop, one back loop).

The pink highlights the stitches where the yarn has been inserted (one front loop, one back loop).

It takes a little while to figure out maneuvering the hook since you don’t yarn over in between the two stitches, but it’s because of that absence of the “yo” that there is almost no visible bump and it’s quite difficult to tell where the decrease is. It’s very effective.

If you really prefer to yarn over between stitches, the next best invisible decrease (in my opinion) is to work the front loops only of both stitches and yarn over after each insertion of the hook. You’ll get a slight bump and it’s not ideal for shaping, but it works fine.

Here are some more photos of the invisible decrease in action. You can see on both the head and the body that the bumps and “squished” stitches are minimalized, and the final doll looks really polished.

Give it a try! I’d love to know what you think.

Hippo Head

Hippo Body

Hippo Square


Stumped

One of the reasons I get sucked into buying so much yarn is I fantasize about all the potential things I could make with the yarn I am drooling over (and end up purchasing).

Logic tends to lock itself in the bathroom and I end up convincing myself I’m going to make THE most beautiful ________ with the threads in my shopping cart.

Case in point: I bought three different sets of color-changing yarn from Bonita Patterns. Like, months ago. I bought two different skeins of each, thinking I could always buy more if I started a large project.

Those beautiful skeins have sat on my shelf just waiting to be used. Last week, I decided to pull one out so I could attempt to start making something as a gift. I researched and researched (until my researcher was sore) until I thought I had figured out exactly what I wanted to make with this stuff:

IMG_7406_zvc

I started a pretty butterfly shawl but wasn’t really feeling it for this particular yarn. (I think the shawl pattern is gorgeous but I believe it would do better with a less fuzzy yarn and something a bit shinier.) Then I tried a wavy scarf pattern but despite my best efforts with it, self-doubt kept creeping in and I decided not to waste anymore yarn and scrap it.

Scraps_zvc

This yarn is a blend of angora and acrylic. It has a nice stiffness to it, so it will hold its shape well, but also has some nice fuzz from the angora.

At this point, I have returned the yarn to its position on the shelf and I am still ruminating on what to DO with it. I have researched patterns from a yarn perspective, yardage perspective, ease of making, you name it. At this point, I’ll need to have an epiphany in a dream. I. Am. Completely. STUMPED. If there is such a thing as Crocheter’s Block, I have it.

If anyone out there has a suggestion or two, send ’em my way!

Back to my crochet lair where I continue with my owl project….


Trashed: A Crochet-Fail Story

Not too long ago, I wrote about how I was trying my hand at Tunisian crochet. Still loving it, although I had to shelve it for a little bit while I worked on other projects and orders.

One of those other projects that I have been undertaking is learning different joining methods for motifs. Specifically, I wanted to become completely comfortable with JAYGO, or join-as-you-go.

I came across the designer and blogger Heidi Bears, who puts together the most beautiful patterns and dolls using the African Flower motif, and knew I had to make one of her designs. I pored through her patterns until I found one that looked reasonable and which she deemed a good one for beginners. (For the record, it is this one.)

After much research and planning, I bought a bunch of colors of sock yarn and I got started making the motifs. I read through the entire pattern and the perused her joining tutorials. I felt ready.

While it definitely took me hours a little while to get the hang of it, including double checking what I was doing with a YouTube video here and there, I eventually and successfully made my first series of joins. I was on my way! Emoticon small

IMG_7286_zc

I carefully went through the pattern little by little, making the various required shapes and joining them. I found my groove and thought I would have this thing done before June was over, easily.

But my grandest project to date–my “Titanic,” if you will–struck a proverbial iceberg when I realized waaaaaaaaaaaaaay too late that I had joined one too many sides of a heptagon (7-sided shape).

Just keep joining, just keep joining....

Just keep joining, just keep joining….

I did my best to fix it; I thought I was being quite ingenious, even, for coming up with a workaround. Alas, it still wound up being a fail. I ended up with a lumpy body with the hole for the head being in the wrong place (not to mention having what looked like a dent sticking out of its backside).

The Iceberg

The Iceberg

I tried cutting just the joined yarn and saving the motifs but it was not to be borne. I was going to have to redo all of my motifs and start again.

There are some valuable lessons to be had, here, but I’m not gonna lie: it reeeeeally sucked to know I would have to repeat all of the motifs I had spent hours on already.

The two quasi silver linings I managed to dig up were: 1) I’ll get to re-order the motifs more strategically the second time around so that half the owl’s body isn’t half dark, half light. 2) When I went back to study the JAYGO method again, I learned that I may have been doing something slightly off with my join method and there may be a way to make it even flatter than it was the first time around.

In any case, some life events have recently caused me to set aside my Owl Redo but I will get back to it and you shall absolutely see the end result when I have conquered this thing. (Maybe this should be called the FAYGO method: Fail-As-You-Go.)

If you have tried your hand at one of these designs or any JAYGO method, I’d love to hear any tips or tricks you may have. This is definitely a work-in-progress, considering I just crashed and burned with my first attempt.

Before I deflated it and started all over *Taps playing*

Before I deflated it and started all over *Taps playing*


Wending My Way Through Tunisian Crochet

For the better part of two years, I have largely focused on amigurumi projects, with a few baby garments and the random accessory here and there. Then I received a terrific book with all kinds of different patterns in it, entitled Crochet One-Skein Wonders. Isn’t that cute?


In it, there are several patterns which refer to Tunisian crochet. I had no idea what an afghan hook was or how this differed from what I had been doing, but I was certainly intrigued, especially by the pictures of the thicker, woven texture of the end products.

My book notes: this book contains projects that are largely for advanced beginners and advanced intermediate crocheters, so they do presume you have a baseline skill set. They give both written and chart instructions where they can, which is also helpful. Lastly, they organize the book by yarn weight, going from lightest to densest, which spoke to my little organized soul. It boasts a nice index.

I began heavily researching Tunisian crochet to see if I wanted to invest more time and money into new hooks and new techniques. Short answer: yes. From what I could tell, this was a distinct twist on my crochet skills that I felt I must have in my repertoire. My basic desire was to be able to create more densely made items that weren’t as “loopy” as standard crochet. For whatever the reason, knitting just does not call to me. So being able to create “knitted” things with a twist on a crochet hook held a strong appeal.

Once I acquired some hooks, books, and even more different types of yarn (mainly cotton blends so I could make All the Washcloths and Pot Holders), I also sunk a little spending money into two Tunisian crochet classes on Craftsy when they were having one of their big sales on classes. If you haven’t checked out Craftsy yet, I strongly recommend it. They are a go-to for any kind of major creative craft medium out there and feature tons of classes, shops, patterns, etc.

After practicing a lot of the stitches on a swatch (some quite unsuccessfully), reading through stitches and patterns, watching YouTube videos, and following along with a number of lessons in one of my Craftsy classes, I finally began to grasp the concepts without flailing about awkwardly with these stranger crochet hooks and different stitch techniques. Because Tunisian crochet is a blend between crocheting and knitting, it takes a bit of practice to get to a baseline comfort level. Once I got the hang of it, though, I started wanting to make more and more items. I’m excited to go to the next level in my class, which creates a colorful shawl/tunic.

Let’s get to the fun stuff; time for some show and tell! These are all beginner projects, mind.

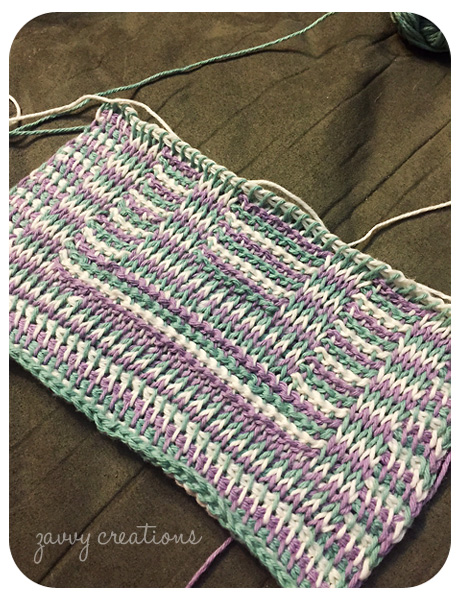
The first two things are washcloths that were part of my online class. They’re the same pattern but in different colors. They utilize three different kinds of stitches to form a lovely embedded square pattern. Here are those stitches up close:

Stitches

Simple Stitch is as easy as it gets. Honestly what is difficult with Tunisian crochet is getting the hang of your tension and making sure the sides even out. Another aspect of Tunisian crochet that I like is, generally speaking, the stitches are universally named. One doesn’t have to convert from UK terms to US terms, for example.

Tunisian Knit Stitch is probably one of the more popular stitches to use, at least from a beginner’s standpoint. It looks exactly like knitting and gives a nice tight weave and beautiful look to the project.

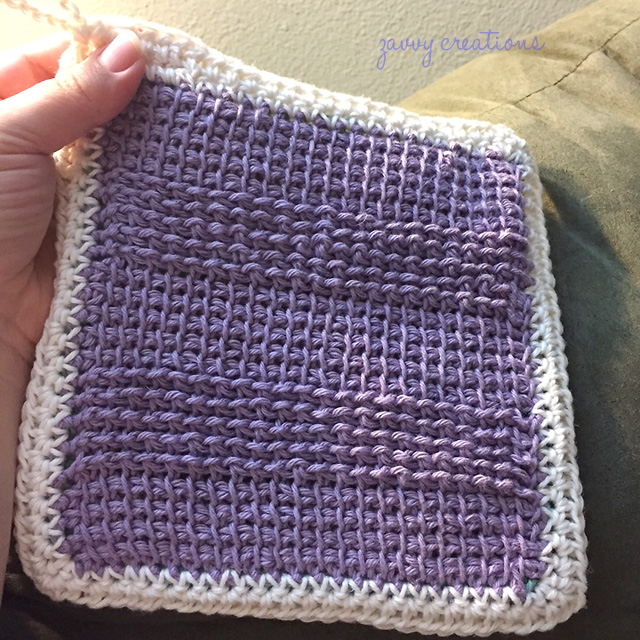
Here is a full shot of the white washcloth after it was steam blocked and left to dry. It still looks a little wavy and uneven but that’s just due to my novice hand. I made this with KnitPicks Shine Sport. It is super soft and I have used it on my own very sensitive skin. I will be making more with this yarn blend of pima cotton and bamboo, but I’ll try out other colors.

First spa washcloth
Next up is the tri-color washcloth. I made this with CotLin, a blend of cotton and linen, also from KnitPicks.

The challenge here was changing colors at the end of each forward pass, each reverse pass, and keeping the sides even.

IMG_7223_webFinished and steam blocked (no pins necessary, thankfully):

IMG_7227_web
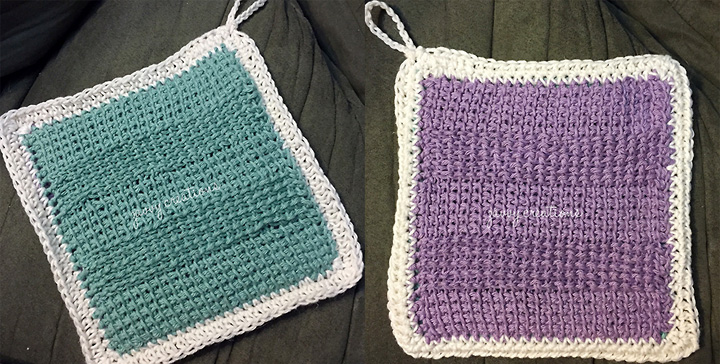
Once I conquered this thing, I wanted to go back to the book I mentioned before and try out the pot holder pattern I initially saw. Because it was entirely in Tunisian Simple Stitch and I wanted to create a slightly different look, I decided to wing it and make my own pot holder without any assistance from a pattern. I know, crazy talk! I have never just begun crocheting without a pattern. But I forged ahead.

I made two squares, same height and width, two different colors, with a third color for an accent color on the border when I crocheted the two sides together. Not too shabby!

PH side 1 PH side 2PH side by side
Because I was using up the CotLin yarn, this is definitely more of a lightweight potholder, but I still think it will do the trick. I’ll have to experiment with bulkier yarns for heavy duty pot holders in the future.

I feel like I’m on my way and I’m looking forward to tackling more complex stitches and patterns that aren’t in simple shapes. I have heard tell that you can do Tunisian crochet in the round, something that intrigues me as an amigurumi maker (since I can now crochet in the round in my sleep). In the second class I purchased from Craftsy, the end project is a fitted sweater vest, which involves shaping, increasing, decreasing, and other scary sounding verbs. I’ll get there.

I absolutely recommend learning this form of crochet for anyone out there who is on the fence, doesn’t know what the heck it is, or has the same desire I did, which was to create less holey items and learn new kinds of stitches. It is seriously fun and interesting, if you geek out over this kind of thing as I do. And I do.

Until next time, friends.
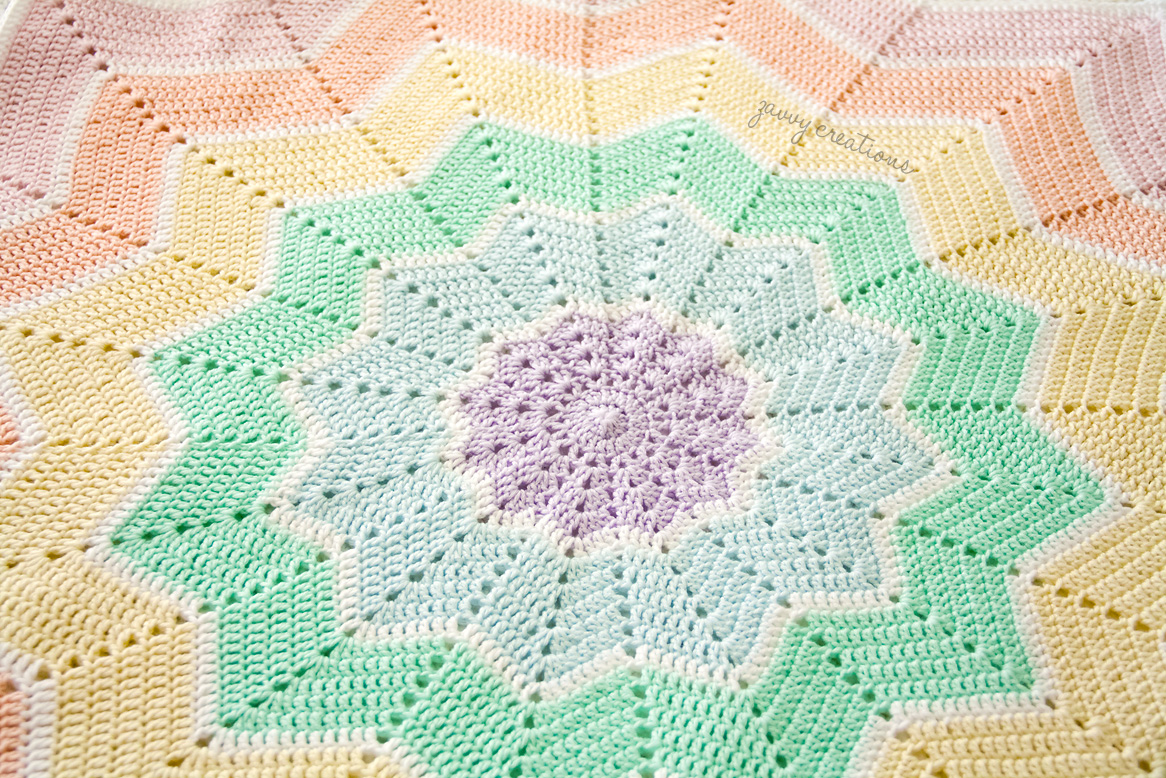
On Making and Selling: A Repost

Because the last few posts I wrote about having an Etsy shop were created on Zoe Says, I thought it would behoove my few/new readers to bring at least one of those posts over here in order to relay a better history on how I got where I am at present with making my little crocheted things–and also selling them.

Please note: the sale I was having back in February is no longer taking place but there will be more promotions–cross my heart!

On Making and Selling.

The Beginning

Well, folks. Here I am. I got to the point where I needed to have a website solely dedicated to the craft of crochet. My personal blog just wasn’t going to cut it any longer.

I intend for this site to be a little of this and a little of that; I’ll be spinning yarns (sorry, had to) on what I’m learning, what I’m making, and what I’m selling. And I’ll infuse it all with some humor along the way.

My name is Zoe and I love crochet–welcome!

Giraffe Straight Chillin  Gemstone Blanket